(Added base description, still needs base picture and strat. EsPY) |
|||
| (22 intermediate revisions by 4 users not shown) | |||
| Line 1: | Line 1: | ||
| + | {{Template:Infobox Map |
||
| − | [[File:Crossfire.png|thumb|300px|right]] |
||
| + | |imagewidth = 300 |
||
| ⚫ | |||
| + | |Map Size = Small |
||
| + | |Terrain Type = Archipelago |
||
| + | |Remake? = Vaguely |
||
| + | |Capture the Flag = Yes |
||
| + | |Flag Exposure = Moderate |
||
| + | |Gen Room Entrances = 2 |
||
| + | |Base Turrets = 2 |
||
| + | |Capture and Hold = No |
||
| + | |Team Deathmatch = No |
||
| + | |Arena = No |
||
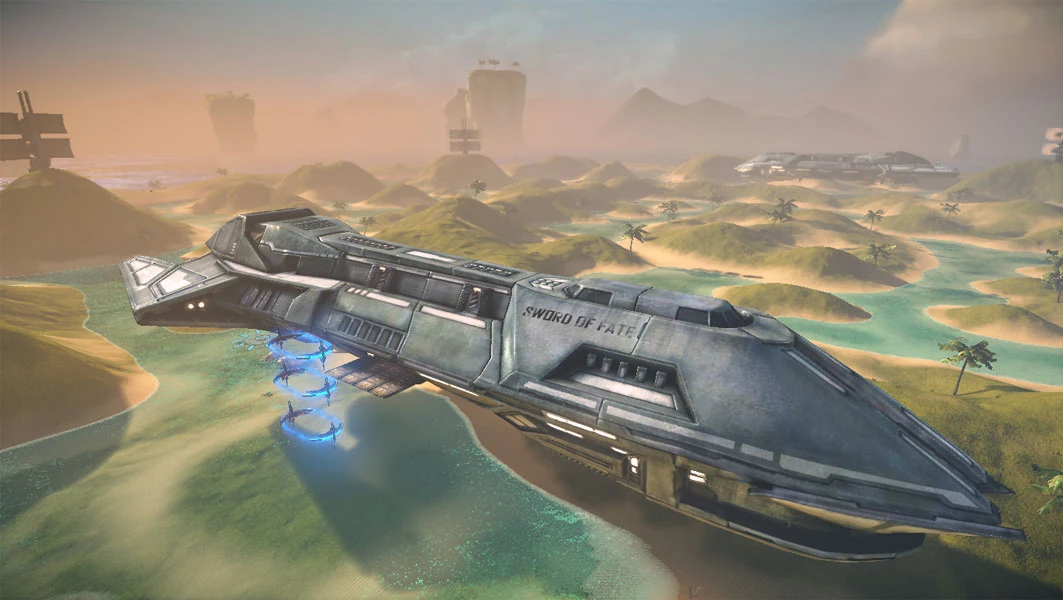
| ⚫ | |Rabbit = No|image = image:Crossfire-wide.jpg|caption = Click Image for Full Size|CTF Blitz = Yes}}'''Crossfire''' is a [[Capture the Flag]] map in [[Tribes: Ascend]]. It is unrelated to the similarly named [[Tribes 2]] map ''Cross Fire'' although it shares many features with the [[Tribes]] map ''Broadside/Blastside'' (small size, floating bases, floating platforms). It takes place on a lush set of tropical islands with the two teams' base ships at opposite ends of the map. The flag stand is more protected than most other CTF maps. |
||
| + | |||
| + | ==Terrain== |
||
| ⚫ | |||
| + | |||
==Base== |
==Base== |
||
| + | [[File:CrossfireBase.png|600px|center]] |
||
| − | The base consists of a two level ship, a vehicle pad, four floating platforms, two base turrets and a sensor. |
||
| − | ===Interior=== |
+ | ===<u>Interior</u>=== |
| − | + | The base ship has two levels: the flag level, and the generator level. There is a shaft at the bow of the base to travel between these two levels. |
|
| + | *On the first floor is the flag stand. This level is the most open to foes running a front/back route, as there are 4 wide entrances (2 on each side). The entrance towards the bow of the ship, is in direct line with the flag stand, while the entrance at the stern of the base has two [[Inventory Station|inventory stations]] and access to the [[conduit]]. |
||
| − | ====First Floor==== |
||
| − | + | *The second is the [[generator ]]level. There are six smaller entrances into this floor from the exterior, 3 per side of the ship. The four stern-most entrances lead to the generator room. The two entrances towards bow lead to a simple room with two inventory stations and the shaft between the two levels. |
|
| − | ====Second Floor==== |
||
| − | This is the generator level. There are six smaller entrances into this floor from the exterior, 3 per side of the ship. The four stern-most entrances lead to the generator room. The two entrances towards bow lead to a simple room with two inventory stations, the vehicle pad and the shaft between the two levels. |
||
| − | ===Exterior=== |
+ | ===<u>Exterior</u>=== |
| − | Outside the ship base |
+ | Outside the ship base has two [[Base Turret]]s, one in front of the bow and one under the stern of the ship. The [[Radar Sensor]] is located under the aft of the ship near the stern base turret. The [[Vehicle Pad|vehicle pad]] is here as well. There are two floating platforms leading toward the stern entrance of the flag stand level. The other two floating platforms are above the bow and aft of the ship and are used to spawn on (although some snipers choose not to move off these platforms). |
| − | == |
+ | ==Offense== |
| + | ===<u>Flag Routes</u>=== |
||
| ⚫ | |||
| + | There are two main flag routes on '''Crossfire'''. The first route is very direct and takes cappers straight through the enemy ship and out the other side. This can be seen in several of the trailers released by Hi-Rez. Cappers can either start from their base and quickly [[Skiing|ski]] across the map, or sneak behind the enemy base and jump through from there. |
||
| − | [[File:CrossfireOverhead.png|thumb|600px|left|Crossfire Overhead Map]] |
||
| + | |||
| − | {{clr}} |
||
| + | The second route takes cappers around the perimeter of the map. Starting from the players' own base ski over to the large hill with what looks like a radar tower on top and get a big burst of speed skiing down it. Disk-jump and jetpack up over the front wing of the enemy ship and skip across the flag stand with enough speed to confuse the [[Base Turret]], then continue back across the map on the perimeter hills. |
||
| − | ==Strategy== |
||
| + | ==Defense== |
||
| − | [[User:SerialPeriph|SerialPeriph]] 06:31, December 15, 2011 (UTC) |
||
| + | ===<u>Flag Defense</u>=== |
||
| + | [[Doombringer]]s commonly deploy [[Force Field|force fields]] both at the sides of the flag stand and inside the entrances to the ship to discourage cappers. A HoF (Heavy on Flag) is good on this map, especially with the maxed out Super Heavy [[perks|perk]]. [[Sentinel]]s can reach the enemy base with their [[BXT1 Rifle|rifles]] because this map is so small, so keeping one nearby is a great help. Keep in mind that the enemy team can easily hit the flag stand with [[Tactical Strike]]s from the safety of their own base and [[Juggernaut]]s will be launching [[Fusion Mortar|Mortars]] in constantly, so defenses will need constant attention. |
||
| + | ====[[Doombringer]]==== |
||
| + | Deploy one [[Force Field]] at the entrance on the opposite side of the ship from the flag;this will protect it a little bit better (until someone gets on the hill behind the ship and starts shooting it) and still block cappers from passing through the ship. Place [[mines]] inside the ship: two in the room near the flag, one just inside from the [[conduit]], and a fourth inside the shaft leading upstairs if you can. A second force field can be placed near the flag stand, preferably on a side, but it will need constant replacing. Depending on the enemy tactics you can either use [[Chain Gun]] or [[Heavy Bolt Launcher]] (for shooting into the ship), whichever you prefer. |
||
| + | ====[[Technician]]==== |
||
| + | Place one [[Light Turret|turret]] on the corner of the front platform that does NOT have the flag, this will get cappers coming in but protect it a little from [[Fusion Mortar|mortars]]. Put a second turret on the corner of the back (starboard) platform of the ship where it can see cappers who pass through after grabbing but also fire on enemies using the [[conduit]]. Be sure this turret has a [[Motion Sensor|motion sensor]] next to it or it's [[Infiltrator]] bait. Place another sensor in the center of the room near the flag to help with Infiltrators and cappers who [[ski]] through. |
||
| + | ====[[Sentinel]]==== |
||
| + | Place [[Claymore Mine|Claymores]] near the flag stand as you prefer depending on which routes cappers are using. Place a [[Drop Jammer]] inside the base to help with [[Infiltrator]]s, preferably on the top (inside) level near the shaft so it's radius will cover the roof and bottom level too. |
||
| + | |||
| + | [[Infiltrator]] |
||
| + | |||
| + | It's preferable to use [[Stealth Spinfusor]] and [[Throwing Knives]]. For this strategy you will need the perk Safety Third and is highly recommend to use Survivalist too. The belt item will be [[Prism Mines]]. Place 4 [[Prism Mines]] in the entrances, Crossfire has 4 entrances per ship (in the flag level),so use 1 mine per entrance. The best place to put mines is between the boxes and the wall. Be always on stealth and the only thing you have to do is wait until someone comes. The Prism Mines' damage is 800 always ([http://www.tribesascendwiki.com/Inheritance Inheritance] doesn't affect them),so,if the stop or they are heavy armours,use the Stealth Spinfusor to finish off them. If the flag carrier gets out of the ship, use the Throwing Knives to bring them down. |
||
| + | [[Category:Map]] |
||
| + | [[Category:Capture the Flag]] |
||
| + | |||
| + | ===<u>Generator Defense</u>=== |
||
| + | The gen room on '''Crossfire''' is contained within the ship and with a few players' attention can be defended more easily than other maps. Most players will focus their defenses on the two entrances to the gen room by deploying [[Light Turret]]s and [[Mines]]. The small door to the gen room itself can also be a last-line choke point by deploying a force field to keep [[Raider]]s and [[Infiltrator]]s from quickly firing in sticky's. A turret behind this force field is a good idea too. '''Crossfire''' is one of the few maps where a player does not need to stay inside the gen room to ensure its security. Because enemies can rarely get inside unnoticed, players can stay outside the ship and still quickly respond if a [[Motion Sensor|motion sensor]] or mine is triggered. |
||
| + | ====[[Doombringer]]==== |
||
| + | Enemy players can come in from the front or back of the ship, so place your [[mines]] around the corner just inside the entrances. Put an additional mine or two on the floor below the entrances. This set up will often kill players over and over since they are in such a hurry to kill the [[generator]]. You can put a [[Force Field]] covering the last doorway to the gen room but be aware of any [[Light Turret]] placement so you don't block their line of fire. If you plan on staying near the gen room the [[Heavy Bolt Launcher]] works great inside the ship. |
||
| + | ====[[Technician]]==== |
||
| + | Defending this gen room as a Tech is somewhat difficult because the entrances are so close to the [[generator]] itself. You can place [[Light Turret|turrents]] inside the gen room but most players will shoot in from out of range. Try placing one directly underneath the rear entrance to the gen room and another right in the generator doorway. Use [[Motion Sensor|motion sensors]] in both entrances and one in the middle of the room. The only way you can defend this room alone however is to stay inside it and back up your turrets, otherwise they will be destroyed in no time. |
||
| + | ==CTF Blitz== |
||
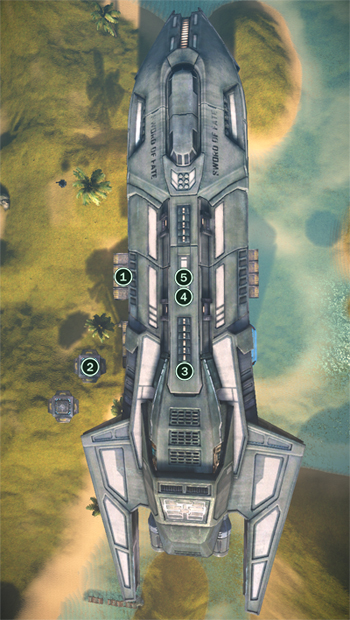
| + | [[File:CrossfireBlitz.jpg|thumb|350px]]In CTF Blitz mode the flag changes locations each time it is captured. Sometimes this makes it harder to grab and sometimes it makes it easier. On '''Crossfire''' the CTF Blitz flag locations are: |
||
| + | #Standard location |
||
| + | #On the closest floating platform to the front of the ship |
||
| + | #Underneath the ship behind the conduit |
||
| + | #On the roof of the ship |
||
| + | #Inside the ship behind the standard flag location |
||
| + | |||
| + | |||
| + | |||
| + | ==Video Guides== |
||
| + | [http://youtu.be/uyYOT-3WgpU Flag Route: "Rock Capping"] by Sangheilian |
||
[[Category:Map]] |
[[Category:Map]] |
||
| + | [[Category:Capture the Flag]] |
||
Latest revision as of 23:33, 28 December 2013
| Crossfire | |
|---|---|
 Click Image for Full Size | |
| Map Size | Small |
| Terrain Type | Archipelago |
| Remake? | Vaguely |
| Capture the Flag | Yes |
| Flag Exposure | Moderate |
| Gen Room Entrances | 2 |
| Base Turrets | 2 |
| Capture and Hold | No |
| CTF Blitz | Yes |
| Team Deathmatch | No |
| Arena | No |
| Rabbit | No |
Crossfire is a Capture the Flag map in Tribes: Ascend. It is unrelated to the similarly named Tribes 2 map Cross Fire although it shares many features with the Tribes map Broadside/Blastside (small size, floating bases, floating platforms). It takes place on a lush set of tropical islands with the two teams' base ships at opposite ends of the map. The flag stand is more protected than most other CTF maps.
Terrain[]
As seen below, Crossfire is set in a tropical archipelago. The map terrain seems to be point symmetric.

Base[]

Interior[]
The base ship has two levels: the flag level, and the generator level. There is a shaft at the bow of the base to travel between these two levels.
- On the first floor is the flag stand. This level is the most open to foes running a front/back route, as there are 4 wide entrances (2 on each side). The entrance towards the bow of the ship, is in direct line with the flag stand, while the entrance at the stern of the base has two inventory stations and access to the conduit.
- The second is the generator level. There are six smaller entrances into this floor from the exterior, 3 per side of the ship. The four stern-most entrances lead to the generator room. The two entrances towards bow lead to a simple room with two inventory stations and the shaft between the two levels.
Exterior[]
Outside the ship base has two Base Turrets, one in front of the bow and one under the stern of the ship. The Radar Sensor is located under the aft of the ship near the stern base turret. The vehicle pad is here as well. There are two floating platforms leading toward the stern entrance of the flag stand level. The other two floating platforms are above the bow and aft of the ship and are used to spawn on (although some snipers choose not to move off these platforms).
Offense[]
Flag Routes[]
There are two main flag routes on Crossfire. The first route is very direct and takes cappers straight through the enemy ship and out the other side. This can be seen in several of the trailers released by Hi-Rez. Cappers can either start from their base and quickly ski across the map, or sneak behind the enemy base and jump through from there.
The second route takes cappers around the perimeter of the map. Starting from the players' own base ski over to the large hill with what looks like a radar tower on top and get a big burst of speed skiing down it. Disk-jump and jetpack up over the front wing of the enemy ship and skip across the flag stand with enough speed to confuse the Base Turret, then continue back across the map on the perimeter hills.
Defense[]
Flag Defense[]
Doombringers commonly deploy force fields both at the sides of the flag stand and inside the entrances to the ship to discourage cappers. A HoF (Heavy on Flag) is good on this map, especially with the maxed out Super Heavy perk. Sentinels can reach the enemy base with their rifles because this map is so small, so keeping one nearby is a great help. Keep in mind that the enemy team can easily hit the flag stand with Tactical Strikes from the safety of their own base and Juggernauts will be launching Mortars in constantly, so defenses will need constant attention.
Doombringer[]
Deploy one Force Field at the entrance on the opposite side of the ship from the flag;this will protect it a little bit better (until someone gets on the hill behind the ship and starts shooting it) and still block cappers from passing through the ship. Place mines inside the ship: two in the room near the flag, one just inside from the conduit, and a fourth inside the shaft leading upstairs if you can. A second force field can be placed near the flag stand, preferably on a side, but it will need constant replacing. Depending on the enemy tactics you can either use Chain Gun or Heavy Bolt Launcher (for shooting into the ship), whichever you prefer.
Technician[]
Place one turret on the corner of the front platform that does NOT have the flag, this will get cappers coming in but protect it a little from mortars. Put a second turret on the corner of the back (starboard) platform of the ship where it can see cappers who pass through after grabbing but also fire on enemies using the conduit. Be sure this turret has a motion sensor next to it or it's Infiltrator bait. Place another sensor in the center of the room near the flag to help with Infiltrators and cappers who ski through.
Sentinel[]
Place Claymores near the flag stand as you prefer depending on which routes cappers are using. Place a Drop Jammer inside the base to help with Infiltrators, preferably on the top (inside) level near the shaft so it's radius will cover the roof and bottom level too.
It's preferable to use Stealth Spinfusor and Throwing Knives. For this strategy you will need the perk Safety Third and is highly recommend to use Survivalist too. The belt item will be Prism Mines. Place 4 Prism Mines in the entrances, Crossfire has 4 entrances per ship (in the flag level),so use 1 mine per entrance. The best place to put mines is between the boxes and the wall. Be always on stealth and the only thing you have to do is wait until someone comes. The Prism Mines' damage is 800 always (Inheritance doesn't affect them),so,if the stop or they are heavy armours,use the Stealth Spinfusor to finish off them. If the flag carrier gets out of the ship, use the Throwing Knives to bring them down.
Generator Defense[]
The gen room on Crossfire is contained within the ship and with a few players' attention can be defended more easily than other maps. Most players will focus their defenses on the two entrances to the gen room by deploying Light Turrets and Mines. The small door to the gen room itself can also be a last-line choke point by deploying a force field to keep Raiders and Infiltrators from quickly firing in sticky's. A turret behind this force field is a good idea too. Crossfire is one of the few maps where a player does not need to stay inside the gen room to ensure its security. Because enemies can rarely get inside unnoticed, players can stay outside the ship and still quickly respond if a motion sensor or mine is triggered.
Doombringer[]
Enemy players can come in from the front or back of the ship, so place your mines around the corner just inside the entrances. Put an additional mine or two on the floor below the entrances. This set up will often kill players over and over since they are in such a hurry to kill the generator. You can put a Force Field covering the last doorway to the gen room but be aware of any Light Turret placement so you don't block their line of fire. If you plan on staying near the gen room the Heavy Bolt Launcher works great inside the ship.
Technician[]
Defending this gen room as a Tech is somewhat difficult because the entrances are so close to the generator itself. You can place turrents inside the gen room but most players will shoot in from out of range. Try placing one directly underneath the rear entrance to the gen room and another right in the generator doorway. Use motion sensors in both entrances and one in the middle of the room. The only way you can defend this room alone however is to stay inside it and back up your turrets, otherwise they will be destroyed in no time.
CTF Blitz[]
In CTF Blitz mode the flag changes locations each time it is captured. Sometimes this makes it harder to grab and sometimes it makes it easier. On Crossfire the CTF Blitz flag locations are:
- Standard location
- On the closest floating platform to the front of the ship
- Underneath the ship behind the conduit
- On the roof of the ship
- Inside the ship behind the standard flag location
Video Guides[]
Flag Route: "Rock Capping" by Sangheilian