(Filled in description and added images) |
|||
| Line 8: | Line 8: | ||
==Base== |
==Base== |
||
'''Drydock''' has a wide open flag stand and a [[Generator]] in the basement. Uphill from the flag stand is a building which has the team's [[Radar Sensor]] on top. Above that is another building which houses two [[Inventory Station]]s. A tower near the flag stand holds another station, and a fourth one can be found down near the generator. There are two [[Base Turret]]s, one next to the entrance to the generator building and another closer to the enemy base downhill from the tower. The Vehicle Pad is located next to the large ship in drydock. There is also another tower near this position where many players respawn which has an additional inventory station. |
'''Drydock''' has a wide open flag stand and a [[Generator]] in the basement. Uphill from the flag stand is a building which has the team's [[Radar Sensor]] on top. Above that is another building which houses two [[Inventory Station]]s. A tower near the flag stand holds another station, and a fourth one can be found down near the generator. There are two [[Base Turret]]s, one next to the entrance to the generator building and another closer to the enemy base downhill from the tower. The Vehicle Pad is located next to the large ship in drydock. There is also another tower near this position where many players respawn which has an additional inventory station. |
||
| − | == |
+ | ==Offense== |
| + | The [[Base Turret]]s '''<span style="font-weight: bold;">on </span>Drydock''' are very vulnerable to both [[Fusion Mortar|Mortar]] and [[Spinfusor Type|Spinfusor]] bombardment. The large middle hill provides a relatively safe position for artillery strikes or snipers to harrass the enemy base. Heavy offense can quickly [[Skiing|ski]] over to either of the [[Generator|generator]] entrances and blast their way inside. The generator can be accessed by a tunnel from the building with the [[Radar Sensor]] on top or through the building adjacent to the flag stand. |
||
| − | |||
| + | ===Flag Routes=== |
||
| − | Will work on this page at another time, |
||
| + | The most common flag capping route on this map is to start behind the bases and travel around so you aproach the flag from uphill. This allows you to build up lots of speed going in for the grab. After taking the flag, you can either cut across the face of the cliff where there are usually more players, or go back around the two capital ships which takes a bit longer. |
||
| − | [[User:SerialPeriph|SerialPeriph]] 06:51, December 15, 2011 (UTC) |
||
| + | ==Defense== |
||
| + | ===Flag Defense=== |
||
| + | The flag on '''Drydock''' is very difficult to defend because it's so open. If you can keep the [[Base Turret]]s up they will help catch more novice cappers, especially if you can back them up with a few [[Light Turret]]s. [[Doombringer]]s can help by laying [[mines]] between the stand and the forward turret, as cappers will often ski across this area after a grab. The openness also makes [[Saber Launcher|Saber]] missiles useful if a foolish capper gets to much air. The Super Heavy [[perks|perk]] is good here since you can usually see cappers coming a long way off, but staying on the flag will be difficult with the ease of enemy bombardment. |
||
| + | ===Generator Defense=== |
||
| + | Both entrances to the gen room have good choke points. Below the ramp inside the flag stand building [[Technician]]s should have a turret set up, as well as some [[Motion Sensor|motion sensors]]. Doombringers and [[Sentinel]]s can place [[mines]] or [[Claymore Mine|claymores]]. Additional mines just inside the gen room itself will catch players who make it inside injured. The back way in has a tunnel which can be blocked by a [[Force Field|force field]] and the entrance to the tunnel (the big hole) is great for hiding mines since most players just jump right in. [[Light Turret]]s should be placed around the corners from this tunnel to surprise enemies who past the first defenses. If there is no force field, a single turrret is often placed in sight of the tunnel to catch players just as they land. Skilled [[Infiltrator]]s and [[Raider]]s will break through these defenses easily, so it is necessary for a player to quickly respond to any indication of a breach. |
||
[[Category:Map]] |
[[Category:Map]] |
||
Revision as of 20:09, 2 April 2012

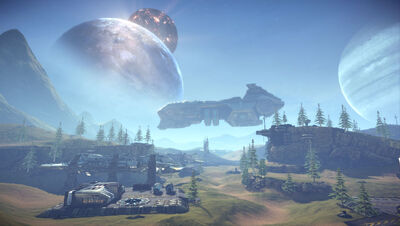
On Drydock capital ships often fly over the landscape and obscure the sun.
Drydock is a Capture-the Flag map in Tribes: Ascend. It is a different map from the similarly named Drydock Night (a Team Deathmatch map), though conceivably takes place on the same world.
Terrain
Like most CTF maps in Tribes: Ascend, Drydock has a symmetrical layout. A large hill with a cliff on one side divides the map, and green rolling hills allow fast ski travel back and forth. The terrain is reminiscent of foothills, with conifer trees and mountains nearby. Large hills around the edges on the map provide good sniping and atrillery positions. Each team has three buildings and a tower which house their base assets, and each side of the map has a capital ship in drydock.

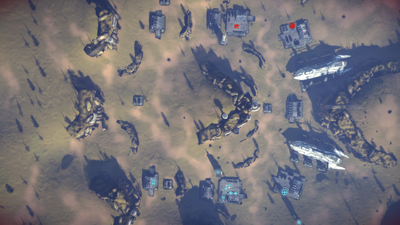
Dry Dock Overhead map
Base
Drydock has a wide open flag stand and a Generator in the basement. Uphill from the flag stand is a building which has the team's Radar Sensor on top. Above that is another building which houses two Inventory Stations. A tower near the flag stand holds another station, and a fourth one can be found down near the generator. There are two Base Turrets, one next to the entrance to the generator building and another closer to the enemy base downhill from the tower. The Vehicle Pad is located next to the large ship in drydock. There is also another tower near this position where many players respawn which has an additional inventory station.
Offense
The Base Turrets on Drydock are very vulnerable to both Mortar and Spinfusor bombardment. The large middle hill provides a relatively safe position for artillery strikes or snipers to harrass the enemy base. Heavy offense can quickly ski over to either of the generator entrances and blast their way inside. The generator can be accessed by a tunnel from the building with the Radar Sensor on top or through the building adjacent to the flag stand.
Flag Routes
The most common flag capping route on this map is to start behind the bases and travel around so you aproach the flag from uphill. This allows you to build up lots of speed going in for the grab. After taking the flag, you can either cut across the face of the cliff where there are usually more players, or go back around the two capital ships which takes a bit longer.
Defense
Flag Defense
The flag on Drydock is very difficult to defend because it's so open. If you can keep the Base Turrets up they will help catch more novice cappers, especially if you can back them up with a few Light Turrets. Doombringers can help by laying mines between the stand and the forward turret, as cappers will often ski across this area after a grab. The openness also makes Saber missiles useful if a foolish capper gets to much air. The Super Heavy perk is good here since you can usually see cappers coming a long way off, but staying on the flag will be difficult with the ease of enemy bombardment.
Generator Defense
Both entrances to the gen room have good choke points. Below the ramp inside the flag stand building Technicians should have a turret set up, as well as some motion sensors. Doombringers and Sentinels can place mines or claymores. Additional mines just inside the gen room itself will catch players who make it inside injured. The back way in has a tunnel which can be blocked by a force field and the entrance to the tunnel (the big hole) is great for hiding mines since most players just jump right in. Light Turrets should be placed around the corners from this tunnel to surprise enemies who past the first defenses. If there is no force field, a single turrret is often placed in sight of the tunnel to catch players just as they land. Skilled Infiltrators and Raiders will break through these defenses easily, so it is necessary for a player to quickly respond to any indication of a breach.